Resources
Videos
Step by step videos of integration from some Major DNS providers
Network Solutions Steps
https://www.screencast.com/t/UpGn4raeIyu
NameCheap
https://www.screencast.com/t/k9qAoPfztJ
Godaddy
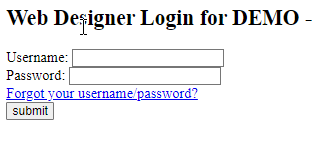
Before you begin, make sure you are using the correct platform. Following instructions are for ChamberMaster and MemberZone; your login screen should look like the following image.


Step 1 – Create the A Record
- We serve your content from
xyz.chambermaster.comor
xyz.memberzone.com,depending on your product, where xyz is the name of your business or organization. However, you will most likely want to brand those pages by using your own domain name. This is highly recommended as it assists on Google Analytics and SEO. Here are some examples:
Example Module Page Locationshttp://business.mydomain.com/http://tourism.mydomain.com/http://members.mydomain.com/
- To allow your content to be available at a similar location, you or your web developer will need to login to your DNS server and create an “A” (address) type record of “business”, “tourism”, “members” (or whatever you decide to call the record) and point it to the IP address “216.17.94.185”
- Once your “A” records have been created, continue on to Step 2.
If you are customer with an existing ChamberMaster/MemberZone integration you may need to integrate your GrowthZone-provided pages into a new development site without affecting the current live site.
To Activate SSL
To activate SSL on ChamberMaster modules pages a support ticket needs to be submitted to websupport@growthzone.com requesting activation.
Are you using Cloudflare?
If your DNS is hosted by Cloudflare the proxy must be turned off for the above A record in order for GrowthZone to enable SSL. A gray cloud indicator should be displayed next to the record that reads “DNS-only”.

Step 2 – Create the Template Page
- Create a new page on your site. Whether via a CMS or a desktop program, create a page, the same way you’d create any other interior page on the site. Give the page a name of
ChamberMaster Template #chamber_master_heading#
or
MemberZone Template – #micronet_heading#
In a WordPress site and many other CMSs this would typically be your post title.
- In the main content area of the page add the text
#CHAMBER_MASTER_CONTENT#
or
#MICRONET_CONTENT#
- Save the page and note the URL. It could look like, but is not limited to, any of the following formats:Example URLs
http://www.mydomain.com/ChamberMaster-Template/
http://www.mydomain.com/pages/chambermastertemplate
http://www.mydomain.com/chambermaster_template.php
http://www.mydomain.com/chambermaster-template-micronet-heading#
- The page should look something like this for ChamberMaster or like this for MemberZone.
- Although we want this page to be ‘published’ (available for viewing by the browser and search engines) you will want to be sure that it’s not included in your site’s navigation. Most CMS will allow you to publish a page while excluding it in the site navigation. This will need to be done so that visitors do not access this page directly.
- Congratulations! You’ve just created the CM/MZ “Template” Page. This page will serve as a “wrapper” for your CM/MZ-provided content. We now need to tell the server to wrap its content in this template.
Step 3 – Update the ISCP
- You will now login to the ISCP (Integration Settings Control Panel) to tell the server to use your new template page. The login location path is “{subdomain.com}/integration/settings/” based on the subdomain. So for example, if you have no “A” type records set up are are using the built-in ChamberMaster/MemberZone subdomains it will look something like this:Example ISCP Locations without A-Record
http://mychamber.chambermaster.com/integration/settings/http://myassociation.memberzone.com/integration/settings/
If you do have an “A” type record set up, it may look something like this:
Example ISCP Locations with A-Recordhttp://business.mychamber.com/integration/settings/http://members.myassociation.com/integration/settings/
- Enter a Username and Password using a “Rep Login” or, if you do not have one, our software support team will be able to provide you with a web designer login.

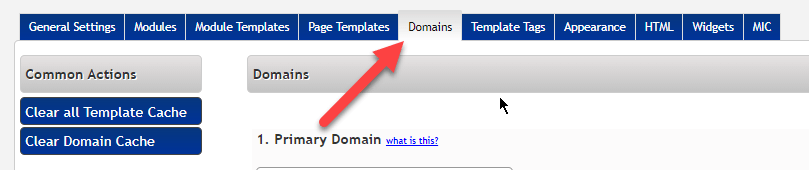
- Once logged in, navigate to the Domains tab.
 Add the created A record into the list of domains toward the bottom and save.
 After saving, choose your A record as the Primary Domain in the drop down and save once more. Click the ‘Clear Domain Cache’ button on the left to ensure the domain is now part of CM/MZ.
- For the current context (domain) you are working in, place the “base” or “root” URL of the site you are working with into the “Base Tag URL Field”. Note that this doesn’t necessarily mean the live site’s domain. If you are working on a dev site the base location would be the “base” or “root” URL of the location of the template you are using.
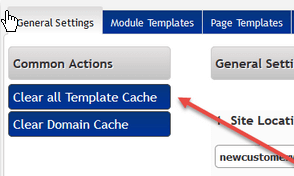
- Navigate to the “Module Templates” tab, and in the “Module Templates” – Default field, drop in the full URL to your CM/MZ Template and click save. You will next clear the module’s cache by clicking the ‘Clear all Template Cache’.
 Your module pages should now resemble the template page placed in the default field.Example Base Locations
http://www.mychamber.com/
http://www.myassociation.com/dev/
http://1273.hosting.hostmydomain.com/root/mydomain.com/
- Select the “Appearance” tab. Fill in the fields as desired, matching the style of the elements on the page with those elements of the site. If there are any CSS overrides or rules that need to be inserted onto the CM/MZ-provided pages there is a Custom CSS field at the bottom of the page where you can place them.
Be sure to select “Save” at the bottom of the corresponding section you’re in to save any changes you make to the style editor or Custom CSS field.
- Check to see that your template is being applied to the CM/MZ-provided pages, by navigating to the /list/ (Member Directory). Again, your URL will depend on whether or not “A” records have been pointed to our servers. Some example urls are:Member Directory Sample Locations
http://mychamber.chambermaster.com/list/
http://myassociation.memberzone.com/list/
http://business.mychamber.com/list/
http://members.myassociation.com/list/
You may need to clear the server’s cache in order for the template to apply. You can do this by appending the “?clearcache=1” query string parameter at the end of the member directory url:
Member Directory Sample Locations with Clear Cache Querystringhttp://mychamber.chambermaster.com/list?clearcache=1
http://myassociation.memberzone.com/list?clearcache=1
http://business.mychamber.com/list?clearcache=1
http://members.myassociation.com/list?clearcache=1
 Add the created A record into the list of domains toward the bottom and save.
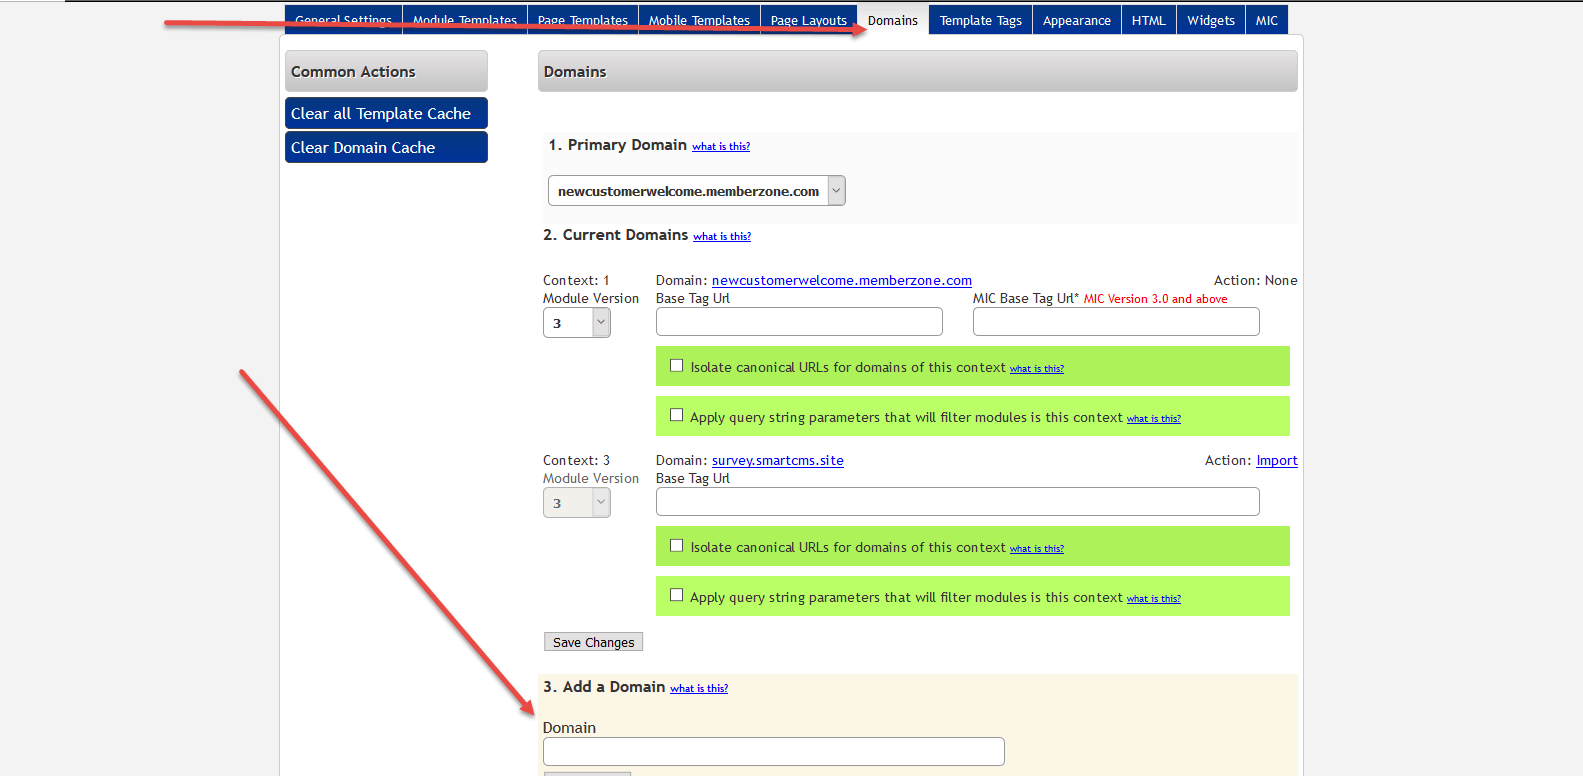 After saving, choose your A record as the Primary Domain in the drop down and save once more. Click the ‘Clear Domain Cache’ button on the left to ensure the domain is now part of CM/MZ.
 Your module pages should now resemble the template page placed in the default field.
For more advanced and unique features of the ISCP, please take a look at the ISCP Overview.
Congratulations! The basic server settings are now configured. When you are ready to “go live” with the Micronet-provided pages, please continue on to Step 4.
Step 4 – Point Links to Module Pages
- Using your CMS or desktop program, create or replace the main links in your site’s navigation, the same way you would create a link and point it to an external page.
- A complete list of the urls that we provide can be found on the “/integration/” page. For example:Example Integration Locations
http://mychamber.chambermaster.com/integration/
http://myassociation.memberzone.com/integration/
http://business.mychamber.com/integration/
http://members.myassociation.com/integration/
- You can copy/paste the urls directly from that page into your CMS, desktop program, or HTM/HTML file.
- For your convenience, here is a list of the following MicroNet pages. Please note that not all pages are available to all customers; the pages marked with asterisks require at least the plus edition of the software in order to be activated:
Contact Us: /contact/ Communication: /communication/ Events (List View): /events/ Events (Calendar View): /events/calendar/ Groups: /groups/ Hot Deals: /hotdeals/ *Info Requests: /info/ Job Postings: /jobs/category/ *Map: /map/ *MarketSpace: /marketspace/ Member Directory: /list/ Members: /members/ Member Login: /login/ *Member to Member Deals: /membertomember/ New Member Application: /member/newmemberapp/ News: /news/ Weather: /weather/ Trip Builder: /tripbuilder/ RFP: /rfp/ Store: /store/ - Also note that you need not link to all CM/MZ provided pages; for example, you may choose to use your own contact or map page instead of the pages that we provide – in that case simply refrain from pointing the link in your navigation. You may notice that there are links in the footer of the CM/MZ-provided pages; if there is a link that should be removed, please feel free to contact our support team and they can remove the link(s) for you.
- You are also able to build custom category links for members and events. This is a great way to theme specific category results pages, and even rename the heading!
- You are now ready to add additional functionality to your site!
Step 5 – Add Additional Functionality
- From the ISCP (Integration Settings Control Panel), navigate to the “widgets” tab (For more information on logging into the ISCP, please see Step 3).
- Select a widget type.
- Drop in the desired values, which will vary by widget.
- Click “Generate”. This will create a javascript widget that you can then place in your site. To generate additional widgets select the field under “widget type”, select the new type, and continue with #3.
- We also recommend that you redirect your main navigation page links, including your old business directory, events, contact etc pages to your new ChamberMaster/Memberzone module pages. You will want to use 301 redirects to accomplish this, either with your CMS or manually via an .htaccess file, for best SEO results in the transition to the new pages.
- Congratulations! You have completed an integration with a ChamberMaster or MemberZone product! If you have any questions, concerns, or comments, please feel free to Contact Us.